Friday, 1 January 2016
How to make a paper gift box
Step by step method with pictures of how to make a paper gift box..make it yourself..it is very easy, interesting..time and money saving..Design your gift box according to your own taste..its fun..

I am fond of creative craft..therefore I used to observe nature, flowers, designs of greeting cards, other gift boxes, decoration pieces..toys..etc and frequently I try to make them myself..this thing delight me the most..and it is my hobby..here I am sharing one of the experiment of making gift box using paper card..

What you need:
A piece of paper 16×24 cm
A measuring scale
Scissors
Marker
Stapler
Decorative items
Start step by step Method (with pictures):
Take a piece of coloured paper or a simple paper, which you want to convert in a gift box..Measure its length using a measuring scale..it should be 24 cm long and 16 cm wide if you want to make a small gift box..the paper you see in the picture is perfectly rectangular.

Let's start..place your piece of paper horizontally..on the table and measure 1 cm using a measuring scale.. Mark a dot and then draw a line of 1 cm ..from the top to the end..Then again measure 8 cm (mark a dot, and draw a line)..next..measure 4 cm and draw a line horizontally on the paper..again measure 8 cm and then the remaining paper will be 4 cm.. See in the picture your paper should be like this:
1 cm, 8 cm, 4 cm, 8 cm 4 cm
From right to left

Now starting from the right, where you have marked 8 cm, measure measure 3.5 cm on the first line and mark a dot..similarly, measure 3.5 cm on the second line mad mark a dot.. Measure 4 cm at the bottom and mark dots now join all the dots as you see in the image

The distance between 4 cm marks and the side lines is 2.1 cm each..

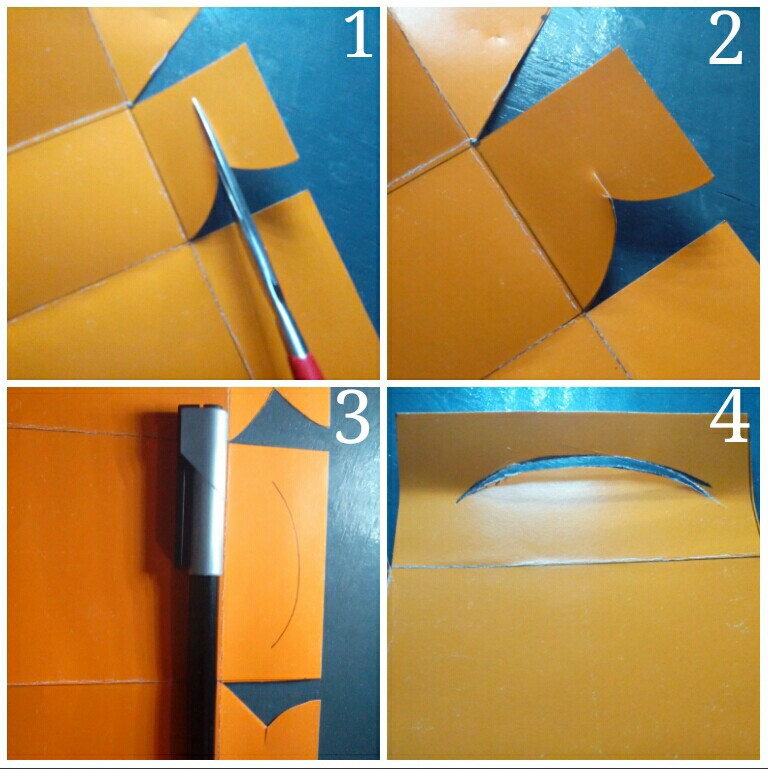
Make this similarly on the opposite side and cut the side triangles(2.1 cm) using scissors..see in the image1 then cut the 1 cm line (extra) to make it equal.

Draw lines as you see in the image to make sections..make a v shape (see in the image 3) and cut it using scissors..this will be the leg of your box that you will insert in the wall of the box.

To understand easily, I have named its different parts see the image carefully..

Now start folding..fold the first line 1 cm..then fold the other one by one ..
Tip: use a scale to fold perfectly according to the lines.

Make a cut on the leg of the box so that it will insert easily..
Mark a curve on the wall and cut it using a paper cutter do not use scissor here.
Under the first leg into the wall and then the second similarly, on the other side..
The box is almost done!..if you are feeling difficulty and the legs do not insert in properly then use a stapler to staple them..

Close the box by inserting arms.. And the head

Decorate your gift box with ribbons, butterflies, glitters or with whatever you have and whatever you want..


Try it yourself..its very easy..your friends will be surprised to see this..tell others who do not know how to make a gift box with a piece of paper which can easily be opened and closed again and again..place in cookies, candies, chocolates, etc..make this creative paper gift box it will be ready in no time!