Popular Posts
-
 How to make a button bowl without a balloon! Easy to make small button bowl that will decorate the corner where you place it..but the th...
 -
 Recycling ideas: how to recycle empty cake wrappers? How to recycle empty cake packets into a useful toolkit ..now..all those things lik...
 -
 Homemade tasbih How to make tasbih at home? Simple and easy method with step by step pictures..some simple things like beads and threa...
 -
 Trendy Flower Blanket/ Curtains: How to crochet flower Blanket: Easy method to make colorful flowers..Join these flowers to make a blank...
 -
 How to crochet a butterfly.. Cute little butterflies..mini crocheted butterflies..how to crochet a small butterfly? Here is a step by ...
 -
 How to crochet a two layered puff stitch flower? Crocheting is a very interesting and 'useful' hobby.. There are various and var...
 -
 How to make personalized 3d greeting card with paper? Things you need: Card paper Colored paper Glue Scissors Method: ...
 -
 3d Rose flower greeting card idea How to make a personalized greeting card with 3d rose flowers..see the easiest method of making 3d ros...
 -
 Recycling old to new Recycle your old perfume bottle into a beautiful vase!. Most of the people may throw the empty perfume bottles ...
 -
 Recycling: old hair catch to new.. How to recycle an old hair catcher to new? So simple and easy with step by step pictures..you only ne...
Archive for February 2016
Button flowers
Button flowers
How to make button flowers with five petals..

What you need:
- Colorful buttons
- Glue
Method:
Simply join five buttons of the same color with glue ..then stick one button of the different color in the center..

Use any where you want..like hand bags..cushions..gift boxes..or any craft project..

If you like the idea ..share it with your friends..
For more creative ideas ..keep visiting the blog.
how to make tasbih?
Homemade tasbih
How to make tasbih at home?
Simple and easy method with step by step pictures..some simple things like beads and thread will be used.

Take the beads and the thread and pass the thread through the hole of the needle..start inserting beads through the needle into the thread..I am making a small tasbih of 33 beads..but you can make a standard tasbih having 100.
Then tie a knot at the end..wind the remaining thread through the knot as I did.

Wind about 15-20 times then cut the thread using scissor..wind another thread in the lower part of the thread..as you see in the image..I am using a golden thread but you can use the same..

Then cut the uneven threads using scissor

Similarly, make other like this..using different colors of threads..

Done!

If you like the idea share it with your friends..for more interesting ideas keep visiting the blog..
Tag :
Homemade,
how to make a button bowl without a balloon!
How to make a button bowl without a balloon!
Easy to make small button bowl that will decorate the corner where you place it..but the thing is..its not made with balloon..but I recycled a plastic bottle...to make this small button bowl.. .here is the step by step method with pictures..there are many art and craft ideas for kids using recycled materials..but this one is so interesting and easy..

Recycling waste materials is always a fun..you can make useful and decorative things in a cheapest way..and certainly can reduce waste from the earth..it is our very first duty to reduce the waste..and create useful thing out of it..many people make button bowls using a balloon..but today I am going to show you how to make a button bowl without a balloon..

See how colorful it looks..it is up to you whether you place it on a table..a corner table..on a reading desk, desktop..TV table, in a window, or decorate in a drawing room..wherever you place it..it adds colors to that corner..even you can wrap it in a gift box and give it to your friends as a gift..they will not believe that it is a recycled bottle..! Even you can make many and sell them at a suitable price for profit..

Things you need:
- 1 empty plastic bottle
- Colorful buttons
- Cutter, scissor
- Super glue
Method:
Take an empty cola bottle and wash it from inside..let it dry..then cut its head..do not take pity just cut away!😊😉.. Then cut its back side also as you see in the image..we just need the middle part which shapes like a bowl..

This step is optional ..do it or not do it..here I have made curved shapes like flower petals to make it more attractive..but you can simply cut a plane round edge..

Using the super glue, start sticking the buttons of different colors from its bottom to the top..here I am using small sized buttons..because we are making a small bowl..they are about 60-70 buttons..

Keep sticking.. .

Until you've covered the whole bowl..


Done!..our small button bowl is ready to decorate any part of the house..

Change the theme of colors..use only one color ..or the combination of two or three colors..will make them more attractive..if you want to make larger bowls then use a big water cane and cut it in a same way..but use big buttons..
If you like the idea of recycling..then share it with your friends..and tell them how to create a mini button bowl..even without a balloon.. They will also like it.

For more creative craft ideas and recycling ideas and art and craft ideas with plastic bottles..for kids..for adults to make and sell..etc..keep visiting the blog..
Happy recycling!
Creative mini shelves : Recycling ideas
Recycling ideas: how to recycle empty cake wrappers?
How to recycle empty cake packets into a useful toolkit ..now..all those things like nailcutter, bandage, scissors, safety pins, rubber bands, needle and thread, buttons etc, which we need in a hurry, can be put at one place.. Specially keys! We often lost the keys..or forget the place after putting them somewhere..
So, here is the problem solved!..simply recycle empty cake wrappers that we always throw in dustbins..here is one idea to recycle them..I have made creative mini shelves..you can also made these at home..with your kids..its so simple and easy.. Below is the method with step by step pictures..

These are empty cake and biscuits wrappers..to write the name of each mini shelf I cut rectangular pieces of white paper, also we use glue stick, scissors, marker, stapler and tape..

Cut the edge of one side with the help of scissor ..so that the packet sticks properly.. Then using a stapler, staple these on a card board or any colored paper..

The place where the stapler did not reach..use scotch tape to stick all the packets properly..also join them with each other using the tape.. Stick all the wrappers then stick the rectangular pieces of white paper on each of the wrapper with a glue stick..

To make it more attractive I made flowers using color paper and join them on the top left corner..you can make paper butterflies, sunflower, daisy flower or some special cartoon characters etc..

Then stick the whole shelf that you make on a wall, corridor wall..on the side of almira or cupboard..or wherever you want.. Place the things of your need in each of the mini shelf..and write their names.

If you like the idea of recycling the waste materials..into useful things..then share it with your friends and tell them how to make a creative and smart mini shelf using cake wrappers..
This creative shelf idea will also decorate your wall..and you will not loose your things at the time of hurry..must try this at home and tell your friends about this..for more craft ideas, recycling ideas, home decor ideas, specially wall hanging craft ideas and button craft ideas..keep visiting the blog..soon more kraft ideas will amaze you!
Recycling: old to new
Recycling: old hair catch to new..
How to recycle an old hair catcher to new? So simple and easy with step by step pictures..you only need two simple things that you will easily find around in the house..recycling is a useful hobby indeed!

Things You Need:
- Old hair catcher
- Wool threads
- Glue
Method:
Take an old hair catch, wool threads and glue.

Start winding the thread..here I am using only blue..but you can use different colors and combinations of different colors..

I have decorated it with a simppe crocheted flower but you can use crocheted rose flower, crocheted daisy flower, sunflower, crocheted butterfly or anything you like..

Cool?
Share the idea with your friends and tell them how to recycle old into new..must try this at home.. For more interesting ideas keep visiting the blog..
Tag :
Crochet,
Recycled Crafts,
3d rose greeting card idea
3d Rose flower greeting card idea
How to make a personalized greeting card with 3d rose flowers..see the easiest method of making 3d rose flowers with step by step pictures..

Things you need:
- Colored papers
- Marker/ led pencil
- Scissors
- Glue
- Decorating buttons

Instructions:
Fist of all take the colored paper for making card..and fold it into half here, I have used yellow paper for the base of my greeting card. Take the red paper for making rose flowers and roughly draw curved line on it

Cut this curved line with scissor and fold it as you see in the image then stick its end with glue..the first rose flower is ready!


Make other flowers with the same method using different colors..

Cut thin strips of the green colored paper for the leaf and stem.. Stick all these in the middle of the greeting card with the help of glue.

Write a message or greeting in the middle and decorate it with buttons of different colors..done!
Greeting card is ready in no time with some simple things.. Must try this at hoke..And give it to your friends, mother, father, brother, sister and surprise them!
If you like the idea, share it with your friends...
For more easy and interesting craft ideas specially recycling ideas keep visiting the blog..
Tag :
Art & Craft,
colorful wool bangles
How to make colorful wool bangles with waste materials.
Recycling the waste materials has always been one of my hobbies..today I recycle a tin can that we usually throw away in a dustbin..beautiful, colorful and attractive bangles can be made with waste materials in no time..

Make these awesome bangles and start selling them right away..or you can also make these for a school fair..there are many projects and different ideas for making money..you must try..make your own handmade shop..!

What you need?
- Empty tin can
- Wool threads
- Cutter
- Scissors
- Super glue
Method:
Take the empty tin can and yarn of different colors..

Cut the tin with the help of a cutter into thin rounds.
Simply wind the thread over it..
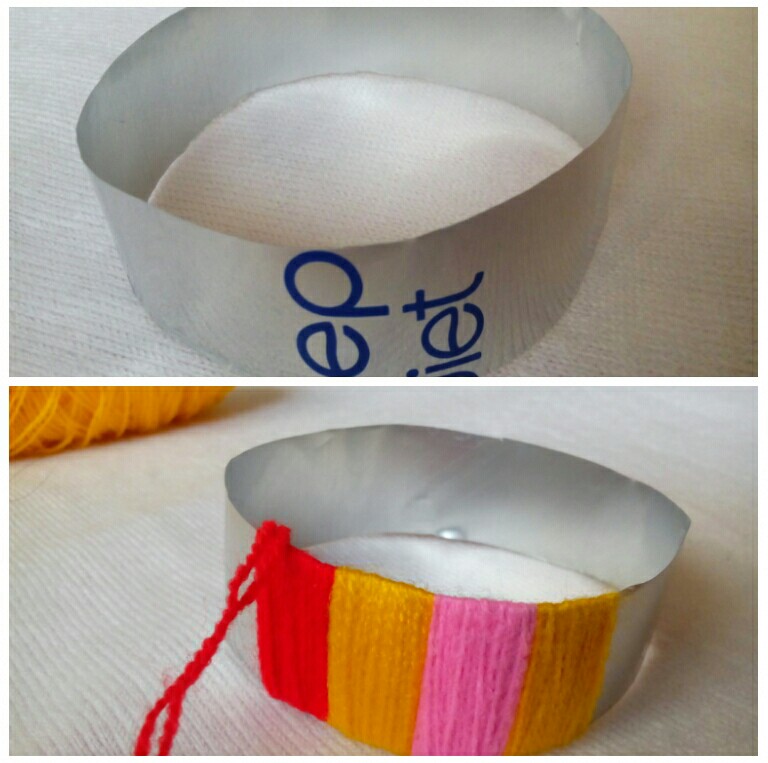
Its done!
So simple and so easy..

Use different color schemes and make other bangles with the combination of different colors..
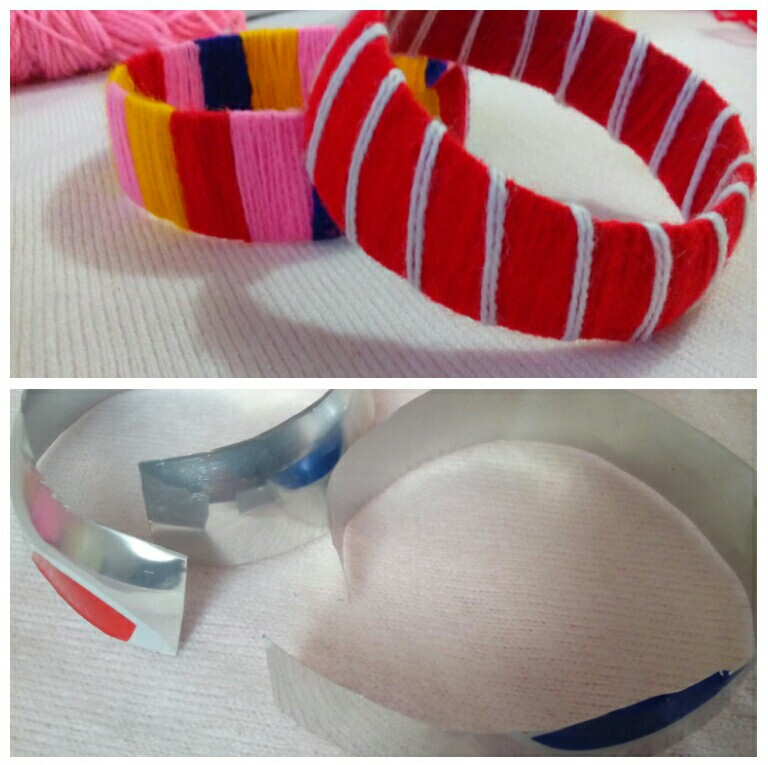


So simple! And easy ofcourse..! If you like the idea of colorful wool bangles ..tell your friends and amaze them..soon in the next few posts I will tell you how to make the crochet flower that I have used here..you see in the above image the pink flower with the button in the center..
Enjoy krafting..!
Tag :
Recycled Crafts,
3d greeting Card ideas
How to make personalized 3d greeting card with paper?

Things you need:
- Card paper
- Colored paper
- Glue
- Scissors
Method:
Take a white paper and fold it like a card..take a colored paper and draw lines on it 1 cm apart from each other. Cut these lines into strips and fold these strips as you see in the image.

I took another piece of paper to write greetings on it..now stick this paper on the card..then start sticking the flowers that we had made earlier. I had also made leaves from the green colored paper.

Now its done! With three simple steps we prepared a beautiful greeting card..now write greetings on it..like happy birthday, happy anniversary, happy new year, or simply thanks..

Give it to your friends or family and share the method too..keep visiting for more interesting ideas..of card making and paper crafts.
Tag :
Art & Craft,