Popular Posts
-
 How to make a button bowl without a balloon! Easy to make small button bowl that will decorate the corner where you place it..but the th...
 -
 Recycling ideas: how to recycle empty cake wrappers? How to recycle empty cake packets into a useful toolkit ..now..all those things lik...
 -
 Homemade tasbih How to make tasbih at home? Simple and easy method with step by step pictures..some simple things like beads and threa...
 -
 Trendy Flower Blanket/ Curtains: How to crochet flower Blanket: Easy method to make colorful flowers..Join these flowers to make a blank...
 -
 How to crochet a butterfly.. Cute little butterflies..mini crocheted butterflies..how to crochet a small butterfly? Here is a step by ...
 -
 How to crochet a two layered puff stitch flower? Crocheting is a very interesting and 'useful' hobby.. There are various and var...
 -
 How to make personalized 3d greeting card with paper? Things you need: Card paper Colored paper Glue Scissors Method: ...
 -
 3d Rose flower greeting card idea How to make a personalized greeting card with 3d rose flowers..see the easiest method of making 3d ros...
 -
 Recycling old to new Recycle your old perfume bottle into a beautiful vase!. Most of the people may throw the empty perfume bottles ...
 -
 Recycling: old hair catch to new.. How to recycle an old hair catcher to new? So simple and easy with step by step pictures..you only ne...
Archive for January 2016
How to draw a Butterfly
How to draw a Butterfly?
When i was a child..I always tried to make butterfly equally on both sides but, there remain some flaws always..which I don't like..therefore I always wanted a frame of butterfly which should be definitely equal at both sides..
I used to cut paper butterflies for greeting cards, for school work and to decorate my room..one day I observed that the remaining piece of paper which everyone throw in the dustbin after cutting a butterfly..can work as a frame for drawing a butterfly.!
Its very simple, to draw a perfect butterfly whose both sides are equal..!
When you cut a butterfly from a piece of paper the leftover extra paper works as a frame of butterfly shape. If you do not know how to cut a paper butterfly then click the link below:
Cut a paper butterfly and place the remaining paper on another piece of paper to draw the butterfly..

Then using a led pencil simply draw!

Darken the shape of butterfly with the pencil and butterfly is ready..make shapes and fill colors of your choice in it..

If you enjoyed the quick method of drawing a butterfly then share it with your friends..and keep visiting for more interesting ideas!
Tag :
Art & Craft,
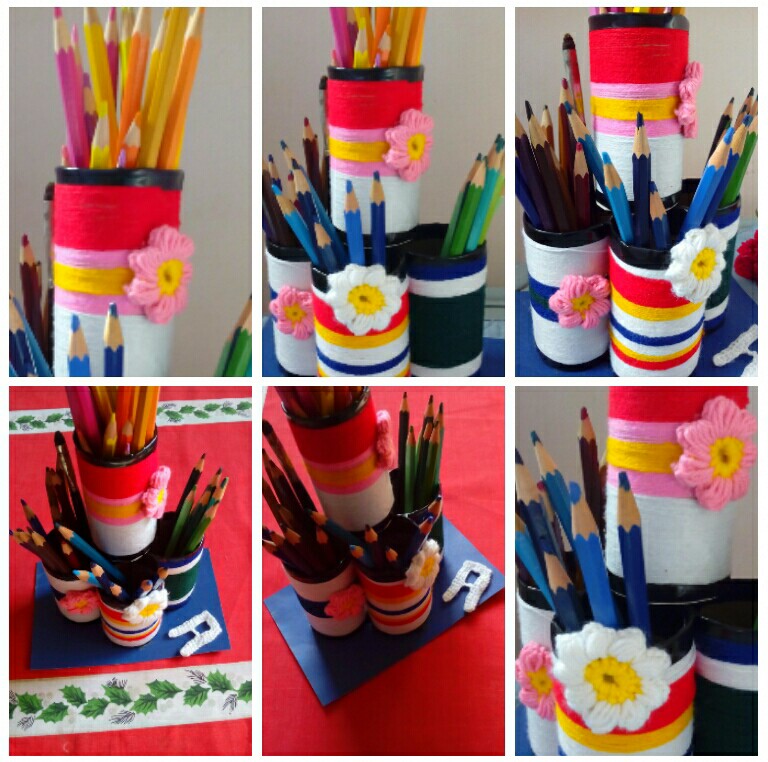
Beautiful Homemade Pencil Box With Waste Materials
How to make a pencil box with Waste materials:

Beautiful homemade pencil box..see how to make a pencil box with toilet paper rolls..decorate the beautiful toilet paper rolls with yarn or crocheted cover or crocheted flowers of different colors..or decorate it with colorful papers and paper butterflies..make different designs of your choice whatever you want..here is an idea of making a superb pencil box using yarn thread..make the beautiful pencil box..place it on your writing table, corner table , in the classroom or make it and sell it to earn money!..

There are a lots of uses of waste materials that we throw in the dustbins..and a number of different useful and decorative items can be made using toilet paper rolls..for making and selling directly..
Do not throw the wrappers or boxes of the food items in the dustbins..just store them in the store room and make as many useful things as you can, using your own creative mind.
Today I will show you how to use extra toilet paper rolls and make a wonderful pencil box in no time..using some common decorative things..firstly you need 4-5 tissue paper rolls for this..here I have used yarn thread to decorate and I have made some crocheted puff flowers to make my pencil box more beautiful and colorful.. One thing is that I have used tape to stick the threads of different colors but you may use glue stick, liquid glue or super glue for sticking the threads.
Now let's start step by step method of making homemade pencil box with some waste materials..
Author: kraft ideas
Theme: Recycled Crafts
What you need:
- 4-5 tissue paper rolls
- Glue stick, tape for sticking
- Yarn threads of different colors
- Scissors
- 8" card board paper for base
Step by Step Method:
Take the tissue paper rolls and the yarn of different colors..if you are using glue stick or glue, apply the glue on one of the paper roll and start sticking the yarn round and round..I have used a small piece of sticking tape on the starting edge of the yarn and in the end. Then cut the yarn for a multicolor pencil box.if you want to make one colored pencil box don't cut the thread then.

I have used pink thread..taped it then used yellow thread for making different patterns and designs..Similarly, I have made 4 others of different designs..and used black tape around the edges..to avoid its rough edges..it is looking more neat now.

Join all the rolls each other with super glue or tape..
For the base: Take a thick card board and make an outline on the card board..apply super glue on the outline and stick the joined rolls..press for some time until it sticks perfectly..leave it for a few minutes..

See I have decorated my pencil box with crocheted puff flowers of white and pink colors..its read to use..you may cut the extra card board leaving 2" from the edges.

Now put all your color pencils, paint brushes, markers etc in it..place your color box on the writing table and make this corner more colorful..
If you like the idea, share it with your friends and tell them how to make a beautiful pencil box with tissue paper rolls..make other like this with different art and craft ideas..sell them or give it to your friends as a gift.. For more art and craft ideas and different useful decorative things from waste materials..keep visiting the blog for the step by step method with pictures, instructions, tips and variations.. Enjoy and be creative..
3d Rose Flower With colored paper
How to make a 3d paper rose
See how to make a 3d rose flower with colored paper..make one flower or create a bouquet of flowers of different colors..here is the method with step by step pictures and instructions..

Materials you need:
Colored piece of paper
Marker
Scissors
Glue
Step by step Method:
(With pictures)
Step 1
Take a square pieces of paper and draw spiral on it..the size of the paper depends on how big your flower should be..

Step 2:
Cut on the lines of the spiral using scissors..

Step 3:
Then cut the extra paper from the side corners to make it round.

Step 4:
Now start curling..and you see a rose shape.. Once you have curled the whole spiral..apply glue in the last and press a little to stick..

Use some green colored paper to make leaves,..its optional ..make more flowers like this.!

Greet your friends..relatives..decorate gift boxes..decorate your room..with this creative art..! Now you can tell everybody that how to make a 3d rose flower with paper and it looks like original..
Tag :
Art & Craft,
Colorful Paper Flowers
Colorful Paper Flowers step by step
These colorful paper flowers are made with colored paper. See how to make flowers with color paper step by step pictures and instructions..which are easy to make beautiful and decorative flowers ..

Materials:
Colored paper
Glue
Scissors
Straw or a thin stick
Start step by step method with pictures:
Step 1:
Take a long rectangular piece of paper of length 18 cm and cut strips (about 1 cm) leaving some space from the upper side..then roll each strip as you see in the image:

Step 2:
Apply some glue on the on the space that you left before..then take the straw(I have painted the straw green) and roll this yellow strip onto the straw.

Step 3:
For the leaves: take a rectangular piece of green colored paper and make thin cuts onto it (see in the image) apply glue on its upper side and roll it the same way as you rolled the flowers before..

Step 4:
Colorful flowers are ready! Try different colors to make more flowers like this and make a bouquet..

I have made red, yellow, and orange flowers..

And these flowers have added colour in my room..they make me please each and every time I look at them..Try these beautiful colored paper flowers..give as a present on a birthday, mothers day, fathers day, teachers day etc..give it to your friends and surprise them..
Tag :
Art & Craft,
Mini Paper Book
Mini paper Book
See how to make a mini paper book with a little effort..it is very easy..there are mini book folding techniques..make it more simple and quick..this mini paper book is made using stapler but soon I will tell you how to make a paper book without staples..here is the step by step method with pictures..

What you need:
Paper (white) for pages
Paper (blue, green) for cover
Scissors
Glue
Stapler
Let's start step by step with pictures:
Take the paper for cover of the book and fold it like a real book cover..as you see in the image:

Now take the paper for the pages of the book fold it then measure it with the size of the book cover and mark a line..Cut.

Cut as many pages as you can then using a stapler, staple all the pages together..apply glue inside the cover of the booklet and stick the stapled pages in it..press with a weight for some time until the pages stick completely.. Then staple the whole book.

Now to give it a real touch..and to hide the stapled pin..take a green piece of paper and apply glue inside it then finally stick this paper to the book where we stapled it..

Its done!!now it up to you..whether you use it on a greeting card as I did..or something else..

Keep visiting the blog for more fun ideas..upcoming post will be a greeting card..
Share with your friends..and tell them how to make a mini paper book..I will soon tell you how to make a mini paper book without staples and also how to make a paper book necklace..etc
Tag :
Art & Craft,
Two colored Butterfly
How to make a two colored Butterfly
Here is the method of how to make a two colored butterfly using paper is very simple and easy..try this at home with kids..friends or class fellows.. Butterfly is always been a fascinating thing for me..since I was a child..I always try to make butterflies of different shapes and colors which will be a little bit difficult for beginners but today I am posting a method of cutting a paper butterfly especially for beginners ..

What you need:
Two pieces of paper of different colors
Scissors
Markers
Take two pieces of papers of different colors and fold them..one piece of paper is a little bigger than the other..

And draw butterflies with a marker on both..and cut using scissor.
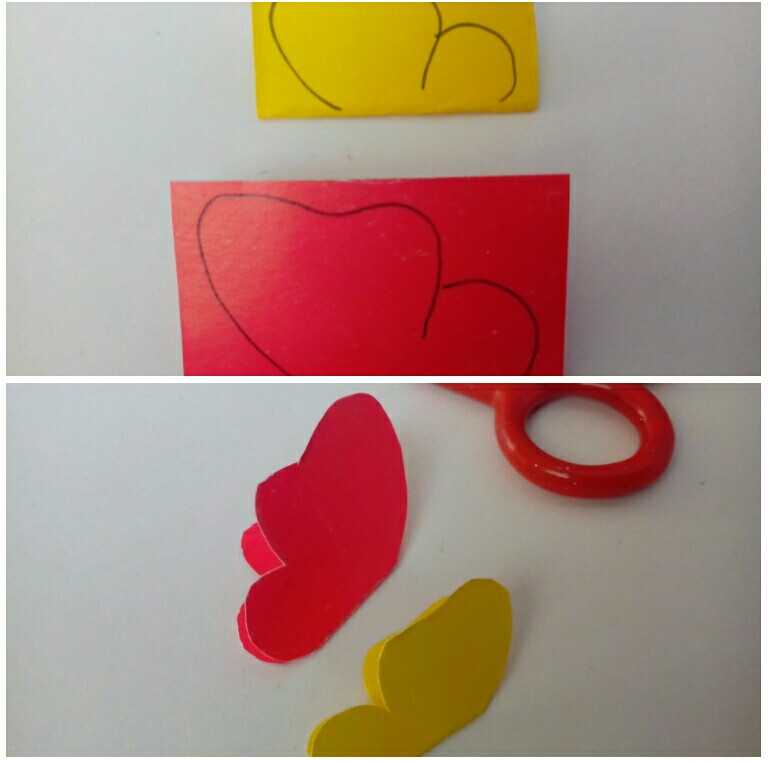
Place the smaller butterfly on the bigger one..and join them with a glue stick.. Its done!

Its ready..decorate gift item..decorate your room walls,,classroom..decorate your notebooks..make greeting cards with this butterfly..keep visiting more interesting crafts are coming soon..like hand made greeting cards..enjoy!
Tag :
Art & Craft,
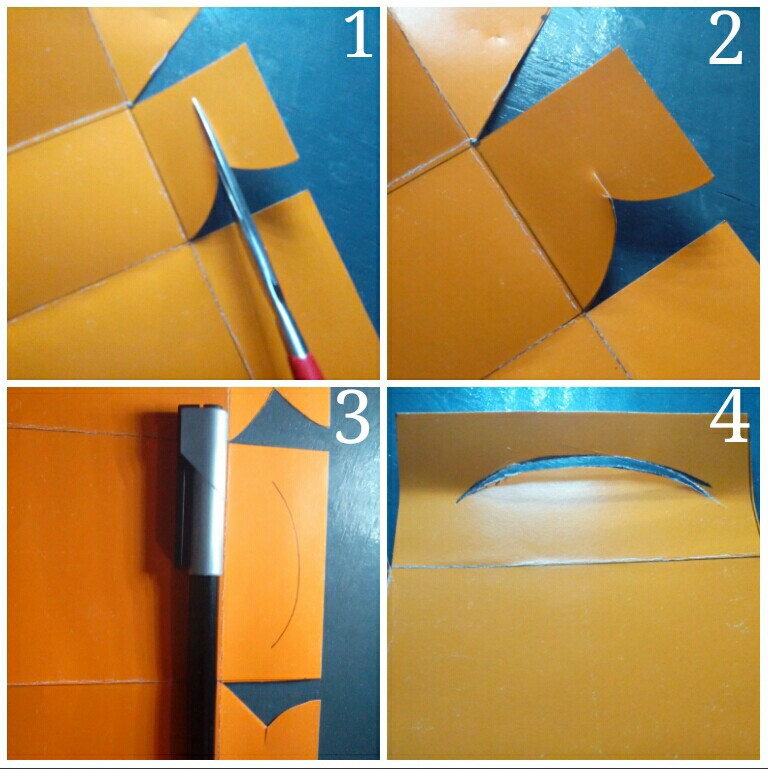
How to make a Paper Gift box
How to make a paper gift box
Step by step method with pictures of how to make a paper gift box..make it yourself..it is very easy, interesting..time and money saving..Design your gift box according to your own taste..its fun..

I am fond of creative craft..therefore I used to observe nature, flowers, designs of greeting cards, other gift boxes, decoration pieces..toys..etc and frequently I try to make them myself..this thing delight me the most..and it is my hobby..here I am sharing one of the experiment of making gift box using paper card..

What you need:
A piece of paper 16×24 cm
A measuring scale
Scissors
Marker
Stapler
Decorative items
Start step by step Method (with pictures):
Take a piece of coloured paper or a simple paper, which you want to convert in a gift box..Measure its length using a measuring scale..it should be 24 cm long and 16 cm wide if you want to make a small gift box..the paper you see in the picture is perfectly rectangular.

Let's start..place your piece of paper horizontally..on the table and measure 1 cm using a measuring scale.. Mark a dot and then draw a line of 1 cm ..from the top to the end..Then again measure 8 cm (mark a dot, and draw a line)..next..measure 4 cm and draw a line horizontally on the paper..again measure 8 cm and then the remaining paper will be 4 cm.. See in the picture your paper should be like this:
1 cm, 8 cm, 4 cm, 8 cm 4 cm
From right to left

Now starting from the right, where you have marked 8 cm, measure measure 3.5 cm on the first line and mark a dot..similarly, measure 3.5 cm on the second line mad mark a dot.. Measure 4 cm at the bottom and mark dots now join all the dots as you see in the image

The distance between 4 cm marks and the side lines is 2.1 cm each..

Make this similarly on the opposite side and cut the side triangles(2.1 cm) using scissors..see in the image1 then cut the 1 cm line (extra) to make it equal.

Draw lines as you see in the image to make sections..make a v shape (see in the image 3) and cut it using scissors..this will be the leg of your box that you will insert in the wall of the box.

To understand easily, I have named its different parts see the image carefully..

Now start folding..fold the first line 1 cm..then fold the other one by one ..
Tip: use a scale to fold perfectly according to the lines.

Make a cut on the leg of the box so that it will insert easily..
Mark a curve on the wall and cut it using a paper cutter do not use scissor here.
Under the first leg into the wall and then the second similarly, on the other side..
The box is almost done!..if you are feeling difficulty and the legs do not insert in properly then use a stapler to staple them..

Close the box by inserting arms.. And the head

Decorate your gift box with ribbons, butterflies, glitters or with whatever you have and whatever you want..


Try it yourself..its very easy..your friends will be surprised to see this..tell others who do not know how to make a gift box with a piece of paper which can easily be opened and closed again and again..place in cookies, candies, chocolates, etc..make this creative paper gift box it will be ready in no time!
Tag :
Art & Craft,
Homemade Playdough

Simple! Non toxic and easy to make play dough at home.
Make your own play dough at home with eatables! its fun!!
Follow the step by step instructions:
Ingredients:
4 cups flour
2 cups table salt
1 cup water
1 tbsp veg oil
Food colouring of 4 different colours
METHOD:
Take four medium bowls, add 1/4 cup of water in each bowl

Then add food colouring

Add a few drops of oil in each bowl

In a large bowl mix together salt and flour.

Mix well

Add one cup of this mixture into each bowl.

Mix well everything

Knead well on a lightly floured surface.

Preserve extra dough in a zip-lock bag

Enjoy!!
Also tell your friends about this exciting experience of homemade play dough..instead of buying expensive dough from the market make your own at home..it is much better in quality and quantity..one thing is that this homemade play dough is non-toxic and free from any mystery ingredients and chemicals that are injurious to health.
Tag :
Homemade,